
Using the Tickets Section in the TTR Pay Dashboard
TTR Pay’s “Tickets” section allows you to create support requests (tickets), view their status, and communicate with the support team. We’ll guide you through navigating to the Tickets section, viewing your ticket list, creating a new ticket, and checking ticket details and replies.
Locating the Tickets Section
- Log in to TTR Pay: After logging in, you will land on your main dashboard.
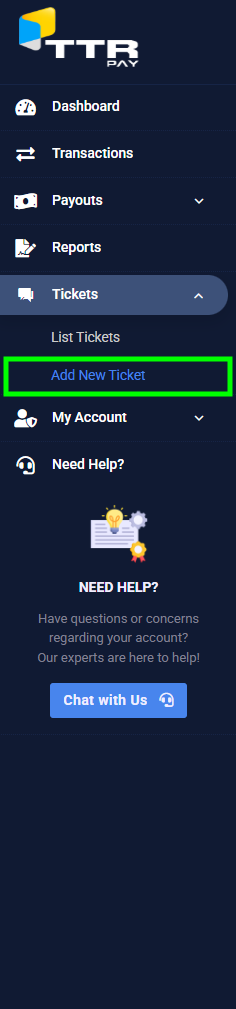
- Open the menu: If the left sidebar menu is hidden, click the Menu icon (≡) in the top left to expand this menu.
- Find “Tickets”: In the sidebar, locate the Tickets section (it may already be expanded by default).
The green highlight in the image shows the “Add New Ticket” menu item, which is what you select to start a new ticket.
See Your Submitted Support Tickets
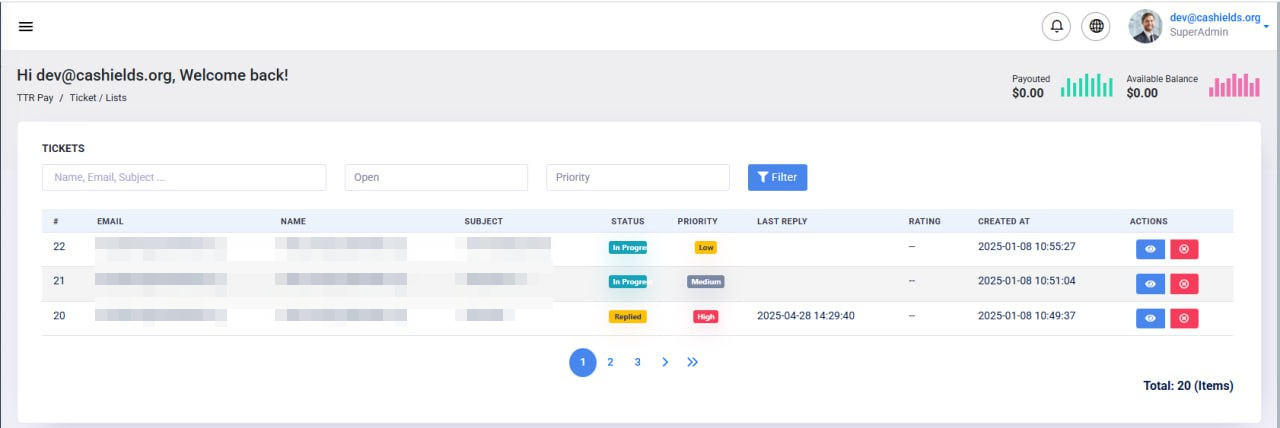
When you click List Tickets, you will see a page listing all your support tickets (as shown above). This List Tickets page is a table that displays key details for each ticket you have submitted. At the top, there are search filters (by name/email/subject, status, and priority) and a Filter button to help you find specific tickets if needed. Each row in the table represents one support ticket. The columns you will see include:
- Ticket # – A unique reference number for the ticket.
- Email – The email address of the account (usually your email) that submitted the ticket.
- Subject – The brief subject line or title of your support request.
- Status – The current status of the ticket (e.g., Open, In Progress, Replied, Resolved). This updates as the support team responds or resolves the issue.
- Priority – The priority level you set for the ticket (Low, Medium, High).
- Last Reply – The date and time of the most recent reply in the ticket (either from you or the support team). If the support team has responded, you’ll see when; if not, it might be blank or show the ticket creation time.
- Created At – The date and time when you originally created the ticket.
- Actions – Quick action buttons for each ticket. Typically, a blue View icon (eye shape) allows you to open and view the ticket details and conversation. There may also be a red Delete/Close icon to close the ticket if your issue is resolved (use this carefully, as closing a ticket might end the support thread).
This layout helps you get an overview of all your requests. For example, you can quickly see which tickets are still Open or In Progress, which ones have received replies, and which issues were marked Resolved. If you have many tickets, use the filter fields at the top to search by keyword (such as subject) or to show only tickets of a certain status or priority.
Creating a New Support Ticket
If you need to reach out to the support team, you can easily create a new ticket. Follow these steps to submit a support ticket:
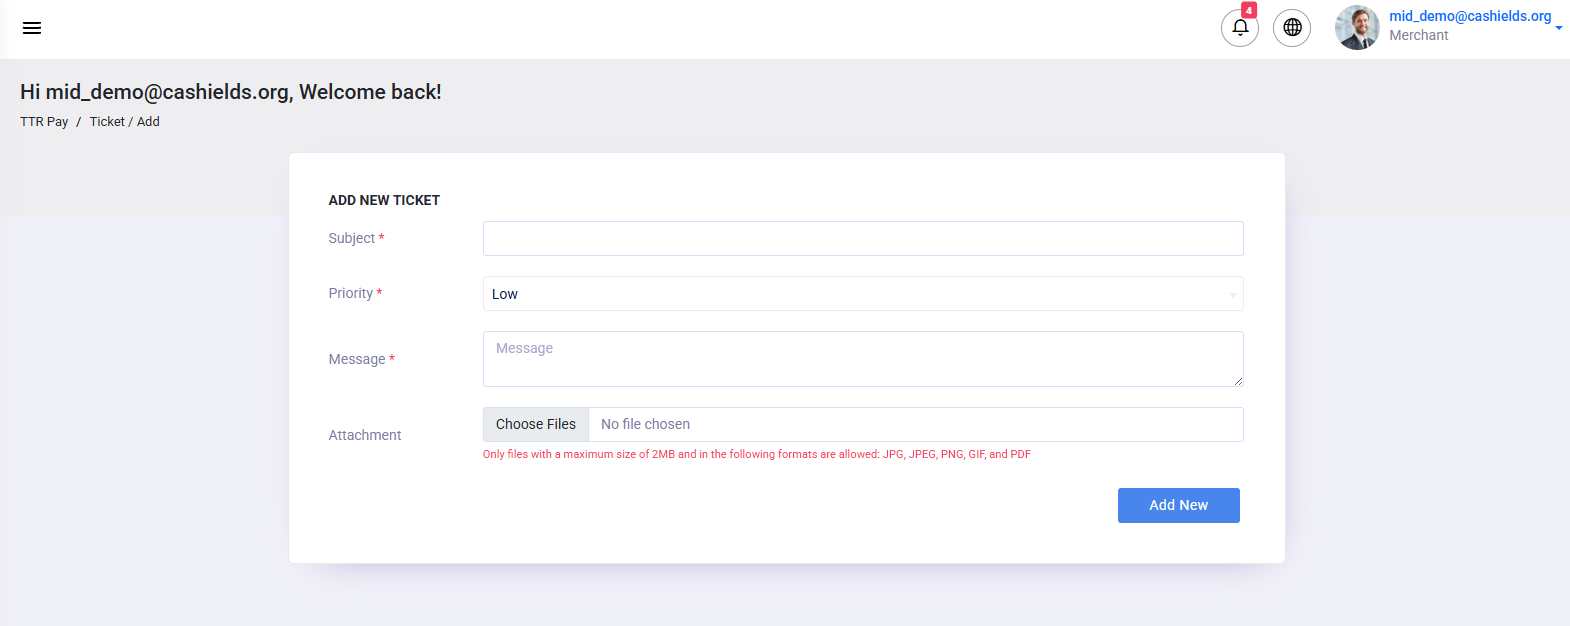
- Navigate to Add New Ticket: In the left menu, click Tickets (if it’s not already expanded) and then select Add New Ticket. This will open the New Ticket form where you can enter the details of your issue or question.
- Enter a Subject: You will be prompted to provide a Subject for your ticket. Enter a short, descriptive title that summarizes your issue. For example, “Unable to process payment”, or “Question about account verification”.
- Write Your Message: In the Message field (marked with a *), type a detailed description of your problem or request. Explain what you need help with, including any relevant details. The more clearly you describe the issue, the easier it will be for support to assist you. (If you received an error code or have specific details, include them here.)
- Attach Files (Optional): If you have any screenshots or documents that can help illustrate the issue, use the Attachment option to add them. Click the Choose Files button and select an image or PDF from your device. Note: The system allows files up to 2MB in size and supports common formats like JPG, PNG, GIF, and PDF. Attaching a screenshot of an error message or a PDF of a receipt can be very helpful for the support team.
- Select Priority: Choose a Priority level for your ticket. There is usually a dropdown for priority on the form. Select Low, Medium, or High based on urgency (we will discuss how to choose the right priority in the Tips section below). For example, a general question might be Low, while an urgent issue that severely affects your business would be High.
- Submit the Ticket: Once you’ve filled in the subject, message, attached any files, and set the priority, click the Submit button (often labeled “Submit Ticket” or “Create Ticket”). After submitting, you should see a confirmation that your ticket was created. The new ticket will now appear in your List Tickets page, usually with a status like Open.
After submitting your ticket, the support team will be notified. You can always return to List Tickets to check the status of your request. Initially, it will be Open (meaning it’s waiting for a support agent to respond). Now, let’s see how to view the ticket details and communicate with support after creation.
Ticket Details and Replies
Once you have one or more tickets submitted, you can view the full details and conversation of a specific ticket by opening it:
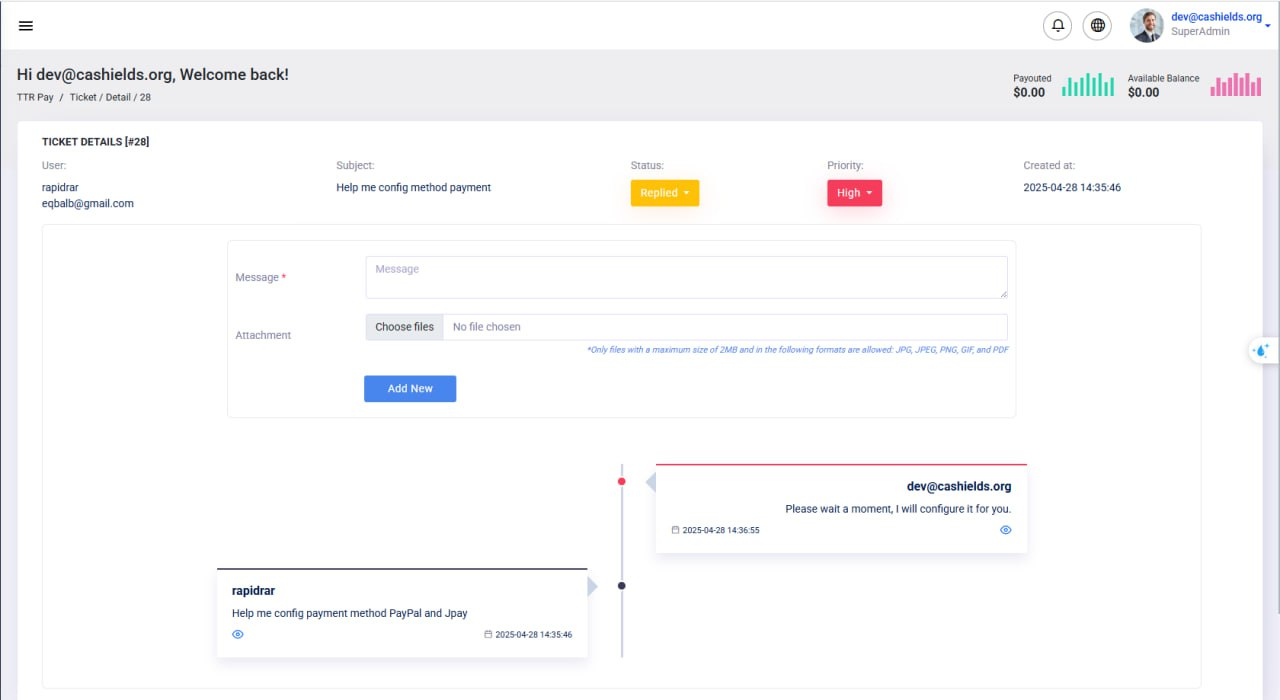
To view a ticket, go to the List Tickets page and click the blue View (eye) icon in the Actions column for that ticket. This will bring you to the Ticket Details page for that specific ticket (as shown in the image above). At the top of the Ticket Details page, you will see information like the Ticket ID (e.g., [#28]), the Subject of the ticket, the Status (e.g., Replied, Open), the Priority level, and when it was Created at. You’ll also see the User who opened the ticket (which should be you, with your email or username).
Below the header information, you’ll find the conversation thread of the ticket:
- Your original message will appear in a chat bubble, often labeled with your name or email (on one side).
- Any replies from the support team will appear in chat bubbles as well, typically labeled with the support agent’s name or the support email (on the opposite side). In the example above, the user “rapidrar” asked for help configuring a payment method, and the support (dev@cashields.org) replied with instructions.
- Each message in the thread is time-stamped, so you know when a reply was posted. This makes it easy to follow the dialogue between you and the support team.
To continue the conversation or provide more information, use the reply form on the Ticket Details page. You will see a Message text box where you can type a new reply, and an Attachment field to add files (just like when creating a ticket). After typing your response (and attaching a file if needed), click the Add New button to post your reply to the ticket. Your reply will then appear in the conversation thread, and the support team will be notified of your update.
You can keep using this Ticket Details page to communicate back-and-forth with support until your issue is resolved. Each time the support team replies, the status might update (for example, from Open to Replied when they reply to you). You’ll also see the Last Reply date update on the List Tickets page. If needed, refresh the page or check your email for notifications to know when support has responded.
Note: There’s no need to create a new ticket for the same issue – simply reply in the existing ticket thread. This keeps all the information in one place, which helps the support team assist you more effectively. When the issue is fully resolved, the support team may mark the ticket as Resolved or close it. You might also have the option to close the ticket yourself if your problem is solved.
Tips for Effective Support Tickets
To ensure you get the best help as quickly as possible, keep these tips in mind when using the Tickets system:
- Write a Clear Subject & Message: Always use a descriptive Subject and provide a detailed message. Instead of saying “Issue with system,” use a clear title like “Unable to Process Payment on [Date]”. In the message, include important details such as what you were doing when the issue occurred, any error messages you saw, relevant transaction IDs, or recent changes on your account. A well-written request helps the support team understand your situation without needing to ask basic questions, which leads to faster resolution.
- Choose the Right Priority: Select the Priority level that matches the urgency of your issue. If it’s a general question or a minor inconvenience, choose Low. For issues that affect your work but are not completely blocking you, Medium is appropriate. Reserve High priority for urgent problems that need immediate attention (for example, the service is down or a critical feature isn’t working, affecting your business). Setting the proper priority ensures that the support team can triage and address tickets in a timely manner. (All tickets are important, but this helps the team identify truly urgent matters quickly.)
- Attach Screenshots or Documents: A picture is worth a thousand words. If applicable, attach a screenshot or relevant document to your ticket. For instance, if you encounter an error message, take a screenshot of it and attach it so the support team can see exactly what you see. Similarly, if you have a document like a billing statement or a log file that’s relevant, include it. Just make sure your attachment is within the 2MB file size limit and in one of the allowed formats (JPG, PNG, GIF, or PDF). Attachments can greatly speed up the troubleshooting process by providing context.
- Be Responsive and Check Back: After submitting a ticket, keep an eye on your email for notifications or check the List Tickets page periodically. If the support team asks for more information or provides a solution, try to respond promptly. Timely replies help resolve your ticket faster.
By following these tips and using the Tickets section as described above, you’ll have a smooth experience getting support through TTR Pay. The system is designed to keep all your support communications organized and easily accessible.
Leave a Reply