
How to Request a Payout in TTR Pay
If you’re new to TTR Pay, this guide will help you navigate the Request Payout feature so you can withdraw funds from your account. We’ll cover how to find the Request Payout page, fill out the payout form (including choosing a payout method and providing your wallet details), understand the balance summary chart, and track your payout requests. By the end, you’ll be able to confidently request payouts and know where to check on their status.
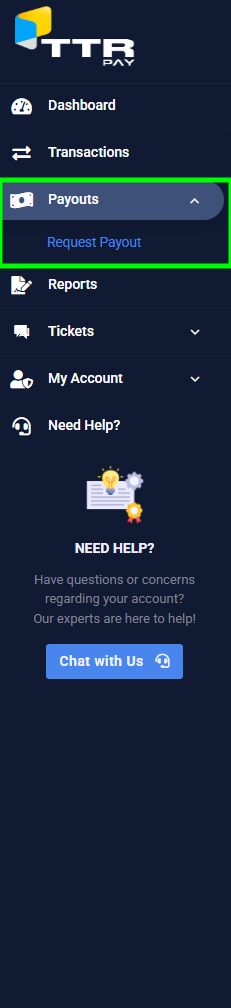
Locating the Request Payout Page
To see your deposit history, first navigate to the List Deposit page in your TTR Pay dashboard. Follow these steps to find it:
- Log in to TTR Pay: After logging in, you will land on your main dashboard.
- Open the menu: If the left sidebar menu is hidden, click the Menu icon (≡) in the top left to expand this menu.
- Find “Payouts”: In the sidebar, locate the Payouts section (it may already be expanded by default).
- Click “Request Payout”: Under Payouts, click on Request Payout. This will open the Request Payout page.
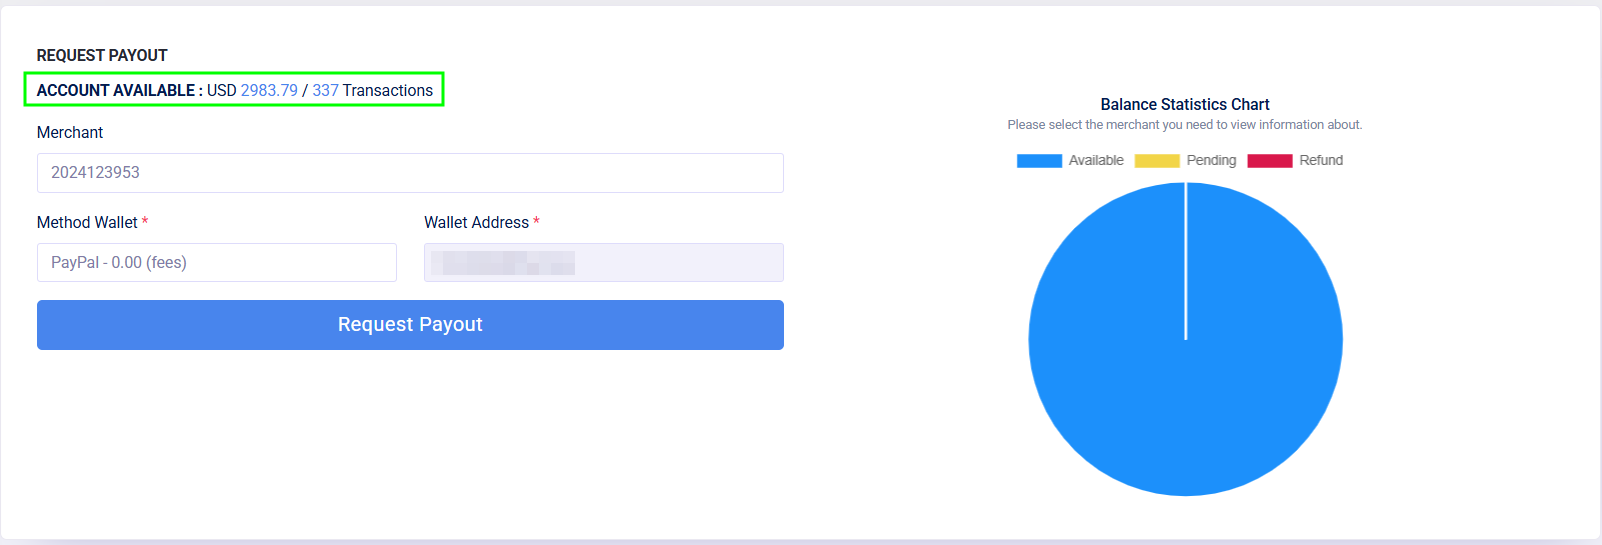
Your Balance Summary
At the top of the Request Payout page, you’ll see a quick balance summary. This includes your Available Balance (the amount currently available for payout) and a Payouted total (the amount you’ve already withdrawn so far). These values may be accompanied by a small chart or bar graph icon showing recent trends in your balance. Your available balance is the maximum amount you can withdraw at that time. For example, if it shows $500.00, you can request a payout up to $500.00. The balance summary provides a visual snapshot of your payout activity and current funds ready to be withdrawn.
Submitting a Payout Request
To request a payout, fill out the Request Payout form on this page. Follow these steps:
- Check your Available Balance: Confirm the amount listed as your available balance (this is how much you can withdraw).
- Select a Payout Method: Choose your preferred payout method from the Method from Payment Settings in My Account. Options include PayPal (to withdraw to your PayPal account), Your Bank Account, BTC BITCOIN or USDT TRC20 (to withdraw as USDT cryptocurrency on the TRON network).
- Submit the Request: Click the Request Payout button (or Submit) to finalize your payout request. Once submitted, the request will be recorded and added to your payout history with a pending status.
Payout Request History
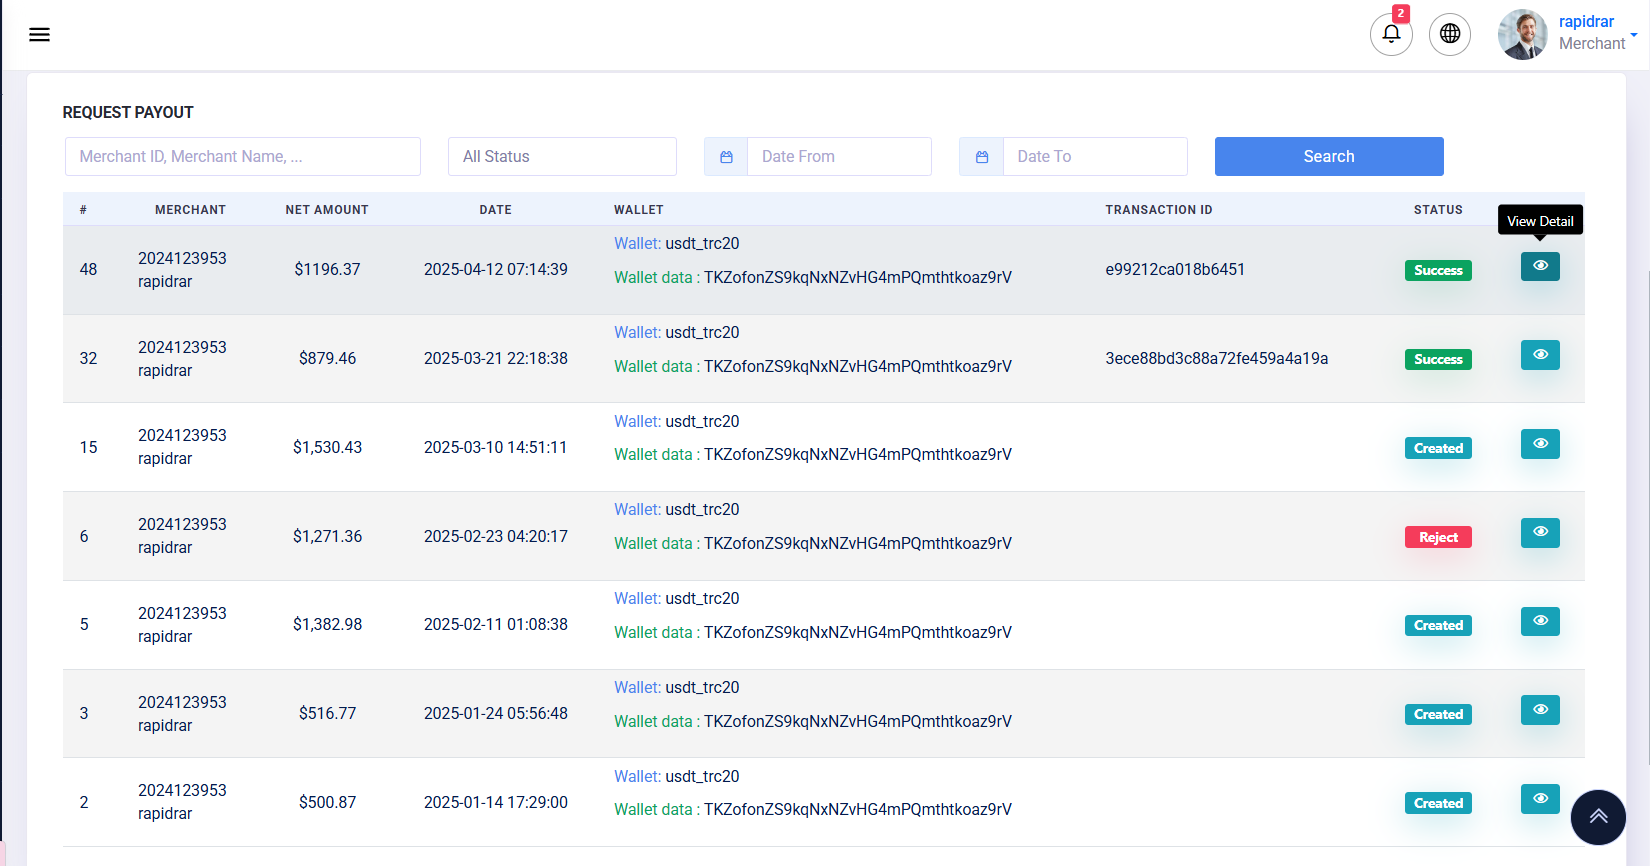
After submitting a payout request, it will appear in your Payout Request History table (as shown in the screenshot). This table lists all your payout requests along with their details and status. Each row of the history table includes:
- Merchant: Your merchant account ID and name (helpful if you manage multiple accounts).
- Net Amount: The amount you requested to be paid out (after any applicable fees).
- Date: The date and time when you made the payout request.
- Wallet: The payout method and destination details. For example, it might show “Wallet: usdt_trc20” plus part of the wallet address, or “Wallet: PayPal” plus the email address.
- Transaction ID: A reference ID for the payout transaction. This could be a blockchain transaction hash (for crypto payouts) or a payment reference number (for PayPal or other methods). It may be populated once the payout is processed.
- Status: The current status of the request. Created means the request is pending processing, Success means the payout was completed, and Reject means the payout was declined. (We’ll cover more about status meanings in the Tips section.)
- Action (View Detail): An eye icon button that you can click to view full details of the payout.
Above this table, you can also find search filters (by merchant, status, or date range) to help you locate specific payout requests if needed. You can use these filters and hit Search to quickly find a particular payout entry.
Viewing Payout Details
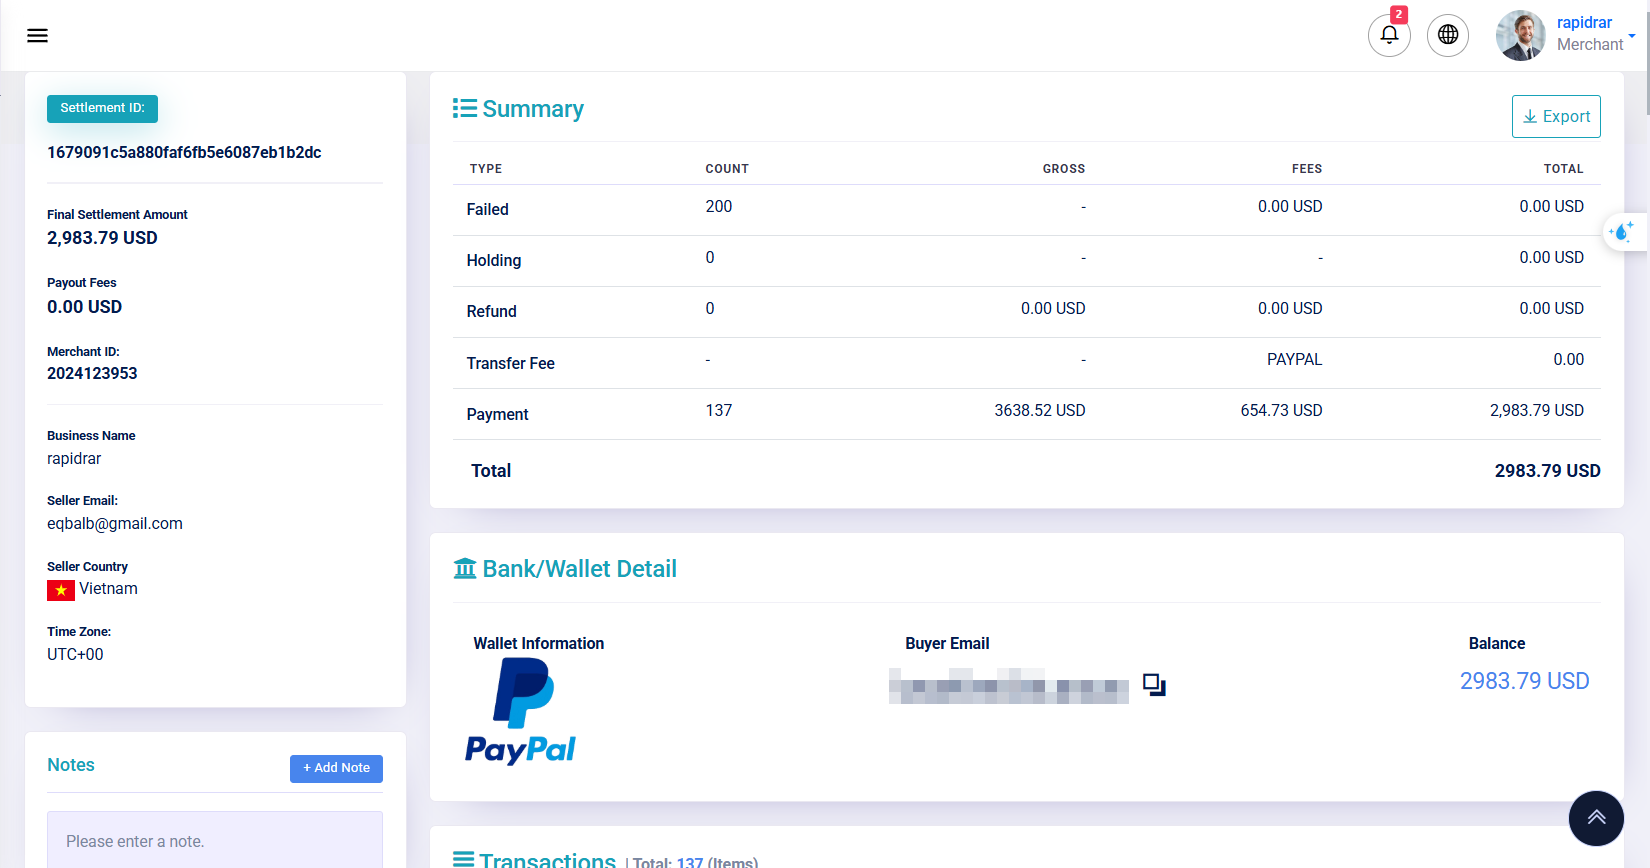
If you want to see more information about a particular payout request, click the View Detail (eye)  icon for that entry in the history table. This opens a detailed Payout Details view for the selected payout. At the top of the detail view, you’ll find a Settlement Summary that breaks down the payout:
- Settlement ID: A unique identifier for the payout transaction (useful for reference).
- Final Settlement Amount: The total amount that was paid out to you in this request.
- Payout Fees: Any fees or charges deducted for this payout (if none, it will show 0.00 USD).
- Breakdown of Transactions: A summary of how the payout was calculated, including the number of transactions included, their total gross amount, any refunds or adjustments, and the fees taken. This helps you see how the final net amount was arrived at.
- Payout Method & Wallet Details: The method used (with an icon, e.g. PayPal or USDT) and the specific account details. For example, for a PayPal payout, you will see the PayPal logo and the email of the PayPal account where the funds were sent; for USDT, you will see the crypto wallet address. The balance or amount sent to that wallet/account is also displayed here.
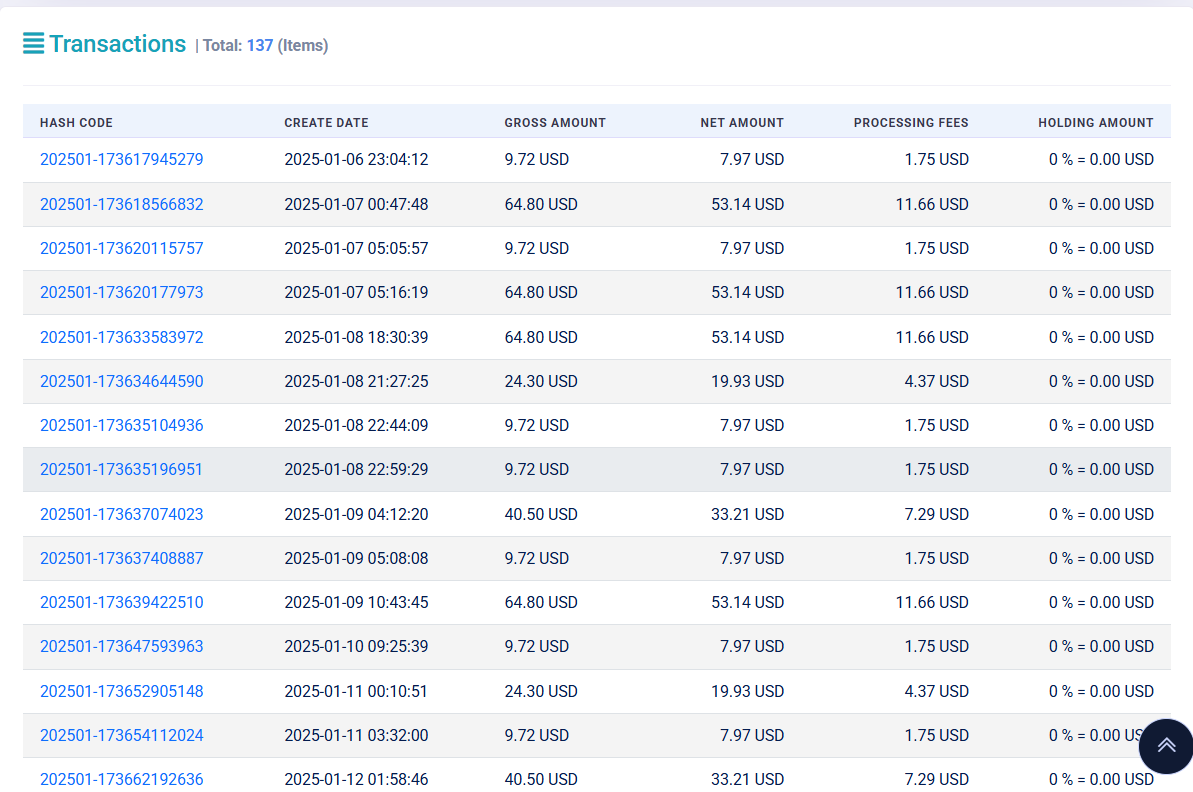
Scrolling down in the Payout Details view, you’ll find a list of all the individual Transactions that were included in that payout. Each transaction entry shows its unique hash/code, the date it was created, the gross amount of that transaction, the net amount after fees, the processing fee applied, and any holding amount (if applicable). This detailed list lets you verify which sales or transactions were settled in the payout and how each contributed to the final amount. You can cross-check these with your transaction records for full transparency.
Exporting Transaction Data from a Payout
In the Request Payout Detail view, you’ll find an Export button ![]() in the top-right corner of the page (next to the payout summary). Clicking this button will download an Excel file (.xlsx) that contains a full list of all transactions included in that payout.
in the top-right corner of the page (next to the payout summary). Clicking this button will download an Excel file (.xlsx) that contains a full list of all transactions included in that payout.
This exported file is useful for bookkeeping, auditing, and cross-checking which transactions were included in your settlement.
What’s in the Exported File?
The exported Excel file contains detailed information for every transaction processed in the payout. Key columns include:
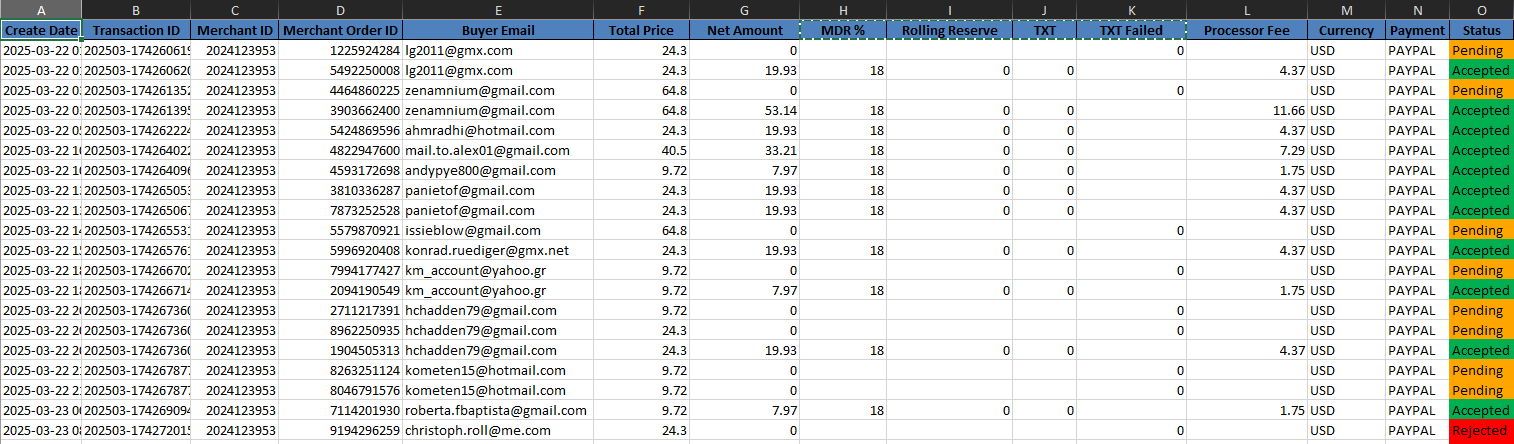
- Create Date: When the transaction was processed.
- Transaction ID: Unique system-generated ID for each payment.
- Merchant ID / Merchant Order ID: Identifiers for your business and the individual orders you handled.
- Buyer Email: Email address of the customer who made the transaction.
- Total Price: Full transaction amount before any deductions.
- Net Amount: The amount credited to your account after fees.
- MDR %: Short for Merchant Discount Rate – this is the platform fee percentage applied to each transaction.
- Rolling Reserve: A holding reserve (if applicable) deducted for risk management purposes (typically zero).
- TXT: Short for Transaction Fee, used internally to track transaction volumes.
- TXT Failed: Depends on the merchant’s contract with us, there will be a Failed Transaction Fee.
- Processor Fee: The total fee by the payment provider (e.g., PayPal fee).
- Currency / Payment Method: Indicates which currency and platform (e.g., PayPal) were used.
- Status: Transaction status – examples include Accepted, Pending, or Rejected.
- USDT Fee: Depends on the merchant’s contract with us and the crypto trading platform of choice.
This breakdown gives you full visibility into how your payout amount was calculated, which fees were applied, and which orders were included.
💡 Note: During our 7-day payment period, we hold 100% of the transaction amount to ensure payment safety. After this holding period ends, we release 100% of the eligible funds to your chosen wallet in the payout.
Tips for Requesting Payouts
- Double-check your wallet details: Always verify the wallet address or PayPal email you enter before submitting a payout request. An incorrect address could result in lost funds or a rejected payout.
- Understand the status labels: A newly submitted request will usually start with a Created status (pending processing). Once the payout is completed and funds have been sent out, the status will change to Success. If there is an issue with the request (for example, invalid payout details or insufficient balance), the status may be updated to Reject (declined). You can always check the history table to see the current status of each request.
- Choose the best payout method for you: Select your payout method based on fees and convenience. For instance, withdrawing via USDT TRC20 might have lower network fees and can be faster if you prefer cryptocurrency (but you’ll need a compatible crypto wallet). On the other hand, PayPal might be more convenient if you want funds in your PayPal account (which you can then transfer to a bank), though PayPal may have its own fees or currency conversion considerations. Consider both cost and convenience when choosing between methods.
Leave a Reply